Print custom receipts
On this page, we will explore how to print custom receipts using the ePOS SDK for Android with PosLink.
Before using the functions below, make sure you have set up the SDK as described in the Setup guide. This is required to access the printingApi instance. If setup is not called, printingApi will be null.
Print custom template
Using our SDK, you can print fully customizable receipts by defining your own template. This lets you tailor the layout and content to match your specific business needs.
To print a custom template, simply call the printCustomTemplate function:
Kotlin (callbacks)
teyaPosLinkSDK.printingApi.printCustomTemplate(buildCustomTemplate())You can build your template using the Template class, which allows you to add rows containing text, images, tables, and other elements. Here’s an example of how to construct a custom template:
Kotlin
fun buildCustomTemplate() = Template(
  listOf(
    ReceiptRow.Item(
      RowElement.Text(
        text = "MMF TEST A920",
        align = Align.Center,
        bold = true,
      )
    ),
    ReceiptRow.Item(
      RowElement.Text(
        text = "Ruzova Dolina 6, Bratislava 85104",
        align = Align.Center,
      )
    ),

    ReceiptRow.Spacer,

    ReceiptRow.Items(
      items = listOf(
        RowElement.Image(
          imageToPrint = Image(
            BitmapFactory.decodeResource(
              this.resources,
              R.drawable.teya_logo
            )
          )
        ),

        RowElement.Image(
          imageToPrint = Image(
            BitmapFactory.decodeResource(
              this.resources,
              R.drawable.success_image
            ),
          ),
          align = Align.Right
        ),

        RowElement.Text(
          text = " Approved",
          align = Align.Left,
          bold = true
        )
      )
    ),

    ReceiptRow.Items(
      items = listOf(
        RowElement.Text(
          text = "CUSTOMER RECEIPT",
          align = Align.Left,
          bold = true
        ),
        RowElement.Text(
          text = "21/02/22 · 10:25",
          align = Align.Right,
          bold = true
        ),
      )
    ),

    ReceiptRow.Spacer,
    ReceiptRow.Divider,

    ReceiptRow.Table(
      headerCells = listOf(
        TableHeaderCell(
          element = RowElement.Text(
            text = "ITEM",
            bold = true,
            align = Align.Left
          ),
          1f
        ),
        TableHeaderCell(
          element = RowElement.Text(
            text = "PRICE",
            bold = true,
            align = Align.Right
          ),
          1f
        ),
      ),
      rows = listOf(
        TableRow(
          cells = listOf(
            RowElement.Text(
              text = "1x SANDWICH",
              align = Align.Left,
              bold = true
            ),
            RowElement.Text(
              text = "£ 5.00",
              align = Align.Right,
              bold = true
            ),
          )
        ),
        TableRow(
          cells = listOf(
            RowElement.Text(
              text = "1x WATER",
              align = Align.Left,
              bold = true
            ),
            RowElement.Text(
              text = "£ 1.00",
              align = Align.Right,
              bold = true
            )
          )
        )
      )
    ),

    ReceiptRow.Spacer,

    ReceiptRow.Items(
      items = listOf(
        RowElement.Text(
          text = "AMOUNT",
          align = Align.Left,
          bold = true
        ),
        RowElement.Text(
          text = "£ 6.00",
          align = Align.Right,
          bold = true
        )
      )
    ),
    ReceiptRow.Items(
      items = listOf(
        RowElement.Text(
          text = "TIPS",
          align = Align.Left,
          bold = true
        ),
        RowElement.Text(
          text = "£ 2.00",
          align = Align.Right,
          bold = true
        )
      )
    ),

    ReceiptRow.Divider,

    ReceiptRow.Items(
      items = listOf(
        RowElement.Text(
          text = "TOTAL",
          align = Align.Left,
          bold = true
        ),
        RowElement.Text(
          text = "£ 8.00",
          align = Align.Right,
          bold = true
        )
      )
    ),

    ReceiptRow.Divider,
    ReceiptRow.Spacer,

    ReceiptRow.Item(
      RowElement.Text(
        text = "Mastercard Contactless ****6787",
        align = Align.Left,
        bold = true
      )
    ),
    ReceiptRow.Item(
      RowElement.Text(
        text = "AID: A00000000041010",
        align = Align.Left,
        bold = true
      )
    ),
    ReceiptRow.Item(
      RowElement.Text(
        text = "Approval code: SsF4e",
        align = Align.Left,
        bold = true
      )
    ),
    ReceiptRow.Items(
      items = listOf(
        RowElement.Text(
          text = "MID: ****5678",
          align = Align.Left,
          bold = true
        ),
        RowElement.Text(
          text = "TID: ****Y002",
          align = Align.Right,
          bold = true
        )
      )
    ),
    ReceiptRow.Item(
      RowElement.Text(
        text = "Reference: 12345678901234567890",
        align = Align.Left,
        bold = true
      )
    ),

    ReceiptRow.Item(
      RowElement.QrCode(
        url = "https://teya.com",
        align = Align.Center
      )
    ),

    ReceiptRow.Spacer,
    ReceiptRow.Spacer,

    ReceiptRow.Item(
      RowElement.Text(
        text = "Thank you",
        align = Align.Center,
        bold = true
      )
    ),
  )
)Result: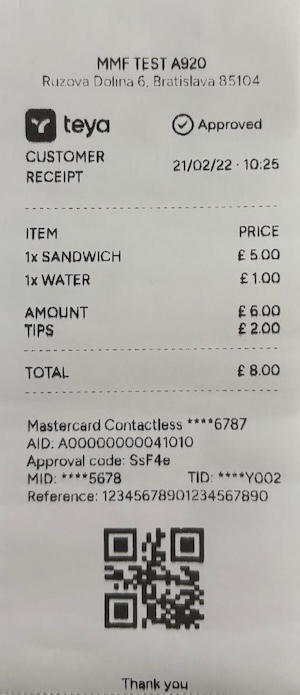
As shown in the example above, you can combine different row types and elements to create a receipt that fits your requirements. Below are the details of the available row types and element types.
Row Types
For the rows, you can use various ReceiptRow types such as Item, Items, Spacer, Divider, and Table.
Item
A single row containing only one element.
Kotlin
ReceiptRow.Item(
    // element
)Items
A row that can contain multiple elements side by side, allowing for more complex layouts within a single row.
All items will be evenly distributed across the row, meaning each item will have equal width. Custom weights for items inside the Items row aren’t supported yet. If you need to use weights, consider using a Table instead.
Kotlin
ReceiptRow.Items(
    // list of elements
)Spacer
An empty row that adds vertical space between other rows, improving readability and visual separation.
Kotlin
ReceiptRow.SpacerDivider
A dashed line that separates sections of the receipt, helping to organize the content.
Kotlin
ReceiptRow.DividerTable
A structured section with a header and multiple data rows, ideal for listing items with columns (e.g., product name and price).
If you set a column’s weight to 0f or less, its width will automatically adjust to fit its content.
Kotlin
ReceiptRow.Table(
    headerCells = listOf(
        TableHeaderCell( /* Text element */, weight = 1f), // The weight parameter allows you to control the width of each column.
        TableHeaderCell(/* Text element */, weight = 1f),
    ),
    rows = listOf(
        TableRow(
            cells = listOf(
                // Text elements
            )
        ),
        TableRow(
            cells = listOf(
                // Text elements
            )
        ),
    )
)Table limitations:
- You can put only
Textelements inside table cells. - The number of header cells must match the number of cells in each row.
- The number of columns in a table cannot exceed 10.
Element types
Within each row, you can use different RowElement types to define the content:
Text
Displays a line of text on the receipt. You can set alignment (left, center, right) and make it bold. Used for headings, messages, or item names.
Kotlin
RowElement.Text(
    text = "Welcome!", // The text to display
    align = Align.Center, // Text alignment: Align.Left, Align.Center, Align.Right (aligns within its container)
    bold = true, // Whether the text should be bold
)Image
Prints a bitmap image (e.g., logo or icon) on the receipt. If you are converting an image to a bitmap, the image should be in PNG or JPEG format.
Kotlin
RowElement.Image(
    imageToPrint = Image(
        // Your bitmap here
    ),
    align = Align.Left // Alignment of the image within its container
)QrCode
Renders a QR code with a specified URL or string. You can set its alignment. Useful for adding links, payment info, or promotions.
Kotlin
RowElement.QrCode(
    url = "https://teya.com", // The URL or string to encode in the QR code
    align = Align.Left // Alignment of the qr code within its container
)Limitations
When building custom templates, keep the following limitations in mind:
- A template can have a maximum of 150 rows.
- Some row and element types have specific limitations, which are described in their individual sections.
- The template is converted to JSON before being sent to the printer, and its total size must not exceed 250 KB.
- Images are converted to Base64 strings, which can significantly increase the size.
If a limitation can be detected immediately, the SDK throws an exception when creating a Template object. If the backend detects a limitation, an error is returned in PrintStateDetails as part of the printing status updates.
Print image
You can also print images directly using the SDK.
To print an image, use the printCustomImage function and pass a bitmap as a parameter:
Kotlin (callbacks)
val receiptBitmap = // Create or load your bitmap here
teyaPosLinkSDK.printingApi.printCustomImage(Image(receiptBitmap))The recommended width is 384 px. Bitmaps wider than this are scaled down to fit the printer width.
If you're converting an image to a bitmap, ensure that the image you want to print is in a compatible format (PNG or JPEG) and properly scaled for the printer.
Limitations
When printing images, keep the following limitations in mind:
- The maximum size for the bitmap is 20 MB
- The maximum height for the bitmap is 10000 px.
- The recommended width for images is 384 px. If you pass a bitmap wider than this, it will be scaled down to fit the printer width.
- We are converting the bitmap to image data before sending it to the printer, and the total size of this data must not exceed 200 KB.
- If this limit is exceeded, an error will be returned in
PrintStateDetailswith a corresponding message.
- If this limit is exceeded, an error will be returned in
If a limitation can be detected immediately, the SDK throws an exception when calling Image function. If the backend detects a limitation, an error is returned in PrintStateDetails as part of the printing status updates.
Subscribe to printing status
Both printCustomTemplate and printCustomImage functions return a PrintingStatusSubscription object. You can use this object to subscribe to printing status updates. In the coroutines API they return a PrintHandle instead, whose state is a StateFlow<PrintStateDetails>; it mirrors PaymentHandle and offers the same awaitCompletion() and stateUntilCompletion() helpers.
Kotlin (callbacks)
val printingStatusSubscription = teyaPosLinkSDK.printingApi.printCustomTemplate(buildCustomTemplate())
printingStatusSubscription.subscribe(object : PrintingStatusSubscription.Listener {
    override fun onPrintingStateChanged(printStateDetails: PrintStateDetails) {
        println("Printing custom template status: $printStateDetails")
    }
})Printing Statuses
When you subscribe to printing status, you can track the following statuses:
| Status | Final? | Description |
|---|---|---|
| Pending | No | Initial temporary state before connecting to the printer. |
| ConnectingToPrinter | No | The system is connecting to the printer to initiate the printing action. |
| Printing | No | The card machine is actively printing. |
| Printed | Yes | The printing action completed successfully. |
| Failed | Yes | The printing action failed. |
If printStateDetails.status is PrintStatus.Printed, the print was successful.
Print Failures
If printStateDetails.status is PrintStatus.Failed, check the printFailure property for the specific error reason:
| Enum Value | Description |
|---|---|
| NetworkError | Connection error occurred. |
| OutOfPaper | The card machine ran out of paper during the printing process. |
| Busy | The printer is currently busy. |
| Overheated | The printer has overheated. |
| CoverOpen | The printer cover is open. |
| LowBattery | The card machine battery is too low to complete the print. |
| Other | An unknown issue occurred. |
Note: For more exact error handling, refer to the
errorMessageproperty inPrintStateDetails, which may contain additional information about the failure e.g "Image size exceeds limit".