Getting Started
For PosLink integration on an ePOS application running on iOS, you are in the right place.
Current version: 1.9.0 (replace <latest-version> below with this one)
1. Get the SDK
Using SPM (Swift Package Manager) - recommended
- Open your iOS project in Xcode
- Go to File → Add Package Dependencies...
- Enter the package URL:
https://github.com/teya-engineering/teya-unified-epos-sdk-pod-spm - Choose the version requirements exact version
- Click Add Package
Including SDK resources
For SPM integration, you'll also need to manually include the compose-resources folder into the Bundle Resources.
- Go to PROJECT settings → Build Phases → Copy Bundle Resources
- Add a new item by clicking on "+" and then "Add Other..."
- Then, navigate to:
~/Library/Developer/Xcode/DerivedData/YourProjectName-someidentifier/SourcePackages/artifacts/teya-unified-epos-sdk-pod-spm/TeyaUnifiedEposSDK/TeyaUnifiedEposSDK.xcframework/ios-arm64/TeyaUnifiedEposSDK.framework/compose-resources - Click "Open"
- Select "Create folder references" and click "Finish"
You should now see an entry like this: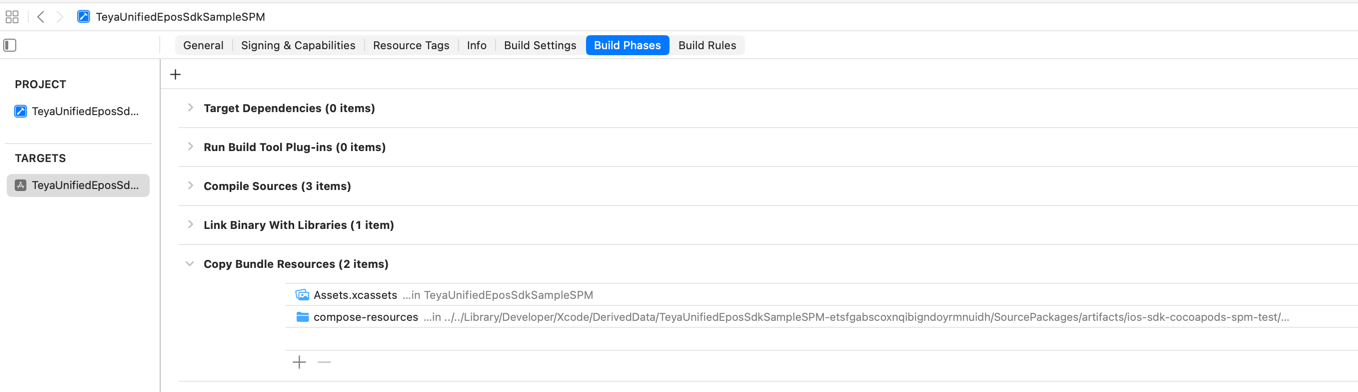
Updating to new versions
- go to your PROJECT settings -> Package Dependencies.
- There, you should see TeyaUnifiedEposSDK listed. In "Dependency Rule", which should be set to Exact Version, change the value to whatever the new version is.
Using Cocoapods
If you're already using Cocoapods, then you can also get the SDK that way.
The CocoaPods trunk stops accepting new versions on 2 December 2026. The last stable SDK version there is 1.9.0. To get newer versions, point your Podfile at our podspec, as shown below. Do not use :git with our repository: it installs a pod with no framework in it.
- Podfile example:
# ...
target 'YourAppTarget' do
    # change <latest-version> in the URL to the actual version name
    pod 'TeyaUnifiedEposSDK', :podspec => 'https://raw.githubusercontent.com/teya-engineering/teya-unified-epos-sdk-pod-spm/<latest-version>/TeyaUnifiedEposSDK.podspec'
end
If your Podfile has the old line pod 'TeyaUnifiedEposSDK', '<version>', replace it with the line above.
Then run (in the project's directory):
pod install
Make sure that "User Script Sandboxing" is set to "No", as CocoaPods runs some scripts at build time.
Updating to new versions
Version ranges like ~> 1.10 do not work with a podspec URL. To update, change the version name in the URL in your Podfile and run:
pod install
2. Get Your Client Credentials
You will need your Client ID and Client Secret, which can be obtained from your developer portal. See Setup & Authentication for what these credentials mean and where to get them.
3. Create the TeyaPosLinkSDK Instance
Initialize the SDK with your credentials and optional parameters:
import Foundation
import TeyaUnifiedEposSDK

// Initialize the SDK
let teyaPosLinkSDK = TeyaPosLinkSDKKt.initialize(
    authConfig: PosLinkSDKAuthConfigManaged(
        clientId: "",       // Replace with your Client ID
        clientSecret: ""    // Replace with your Client Secret
    ),
    isProductionEnv: false, // Set to true for production
    eposInstanceId: nil,     // Optional: identifier for your ePOS app instance
    logger: SDKLoggerImpl() // Optional: your custom logger implementation
)
4. Add Custom Logging
To enable logging, you can pass a custom logger by implementing the TeyaSDKLogger protocol.
import Foundation
import TeyaUnifiedEposSDK

private class SDKLoggerImpl: TeyaSDKLogger {
    func d(message: String) {
        print("[DEBUG] SDK: \(message)")
    }

    func i(message: String) {
        print("[INFO] SDK: \(message)")
    }

    func w(message: String) {
        print("[WARNING] SDK: \(message)")
    }

    func e(message: String) {
        print("[ERROR] SDK: \(message)")
    }
}
See Debug, Info, Warning, Error for what each log level means.
5. Set up the SDK
Use setup to run the SDK's built-in authentication, store selection, and card machine selection UI (see Setup & Authentication for what this covers). After successful setup, you can call functions on transactionsApi and printingApi.
import Foundation
import TeyaUnifiedEposSDK

teyaPosLinkSDK.setup(
    onFailure: { failure in
        // Handle initialization failure
        print("SDK setup failed: \(failure)")
    },
    onSuccess: {
        // Initialization succeeded: you can now use the APIs.

        teyaPosLinkSDK.transactionsApi. // Call functions on TeyaCommonTransactionsApi
        teyaPosLinkSDK.printingApi. // Call functions on TeyaCommonPrintingApi
    }
)
This setup call is required every time you want to access the TeyaCommonTransactionsApi.
If the user is already authenticated and linked, the SDK will skip any UI and automatically load credentials from disk.
Managing the device link
Set up without card machine linking
Use setupAuthAndStore to defer card machine selection (see Setup & Authentication) and link one later with linkTerminal.
teyaPosLinkSDK.setupAuthAndStore(
    onFailure: { failure in
        // Handle setup failure
        print("setupAuthAndStore failed: \(failure)")
    },
    onSuccess: {
        // Authentication and store linking succeeded.
        // Call linkTerminal before making payments.
    }
)
After setupAuthAndStore succeeds, linkedDeviceDetails will be nil (no terminal linked yet) but linkedStore will reflect the linked store.
You must call linkTerminal before using transactionsApi or printingApi.
Linked device details
To retrieve the currently linked device details, you can access the LinkedDeviceDetails, which contains the relevant information.
let details = teyaPosLinkSDK.linkedDeviceDetails // non-nil only when both store and terminal are linked
let store = teyaPosLinkSDK.linkedStore           // non-nil when a store is linked
let terminal = teyaPosLinkSDK.linkedTerminal     // non-nil when a terminal is linked
The LinkedDeviceDetails contains information about your selected Terminal and Store. It is only non-nil when both are linked.
Get card machines
Retrieve the card machines for the currently linked store with getTerminals. Pass forceRefresh: true to bypass the cache and fetch from the network, or forceRefresh: false to use cached results.
teyaPosLinkSDK.getTerminals(
    onFailure: { failure in
        // Handle failure - check failure.reason and failure.debugErrorMessage
        print("Get terminals failed: \(failure)")
    },
    onSuccess: { terminals in
        // terminals: [Terminal]
        for terminal in terminals {
            print("Terminal: \(terminal.name) (\(terminal.id))")
        }
    },
    forceRefresh: false
)
Link card machine
Use linkTerminal to switch card machines (see Setup & Authentication). Pass a specific card machine ID (e.g. one returned by getTerminals), or nil to show the SDK's built-in selection UI.
// Option 1: Show the terminal selection UI
teyaPosLinkSDK.linkTerminal(
    terminalId: nil,
    onSuccess: { terminal in
        // terminal: Terminal - the newly linked terminal
        print("Linked to: \(terminal.name)")
    },
    onFailure: { failure in
        // Handle failure - check failure.reason and failure.debugErrorMessage
        print("Link terminal failed: \(failure)")
    }
)

// Option 2: Link directly by terminal ID
teyaPosLinkSDK.linkTerminal(
    terminalId: "terminal-id-from-getTerminals",
    onSuccess: { terminal in
        // terminal: Terminal - the newly linked terminal
    },
    onFailure: { failure in
        // Handle failure
    }
)
Clearing auth and device details
clearUserAuth clears authentication and the device link (see Setup & Authentication):
teyaPosLinkSDK.clearUserAuth()
clearDeviceLink clears only the store and card machine link, preserving authentication:
teyaPosLinkSDK.clearDeviceLink()
After calling either clearUserAuth or clearDeviceLink, you must call setup again before performing any operations with the SDK.
Sample app
A complete iOS sample application demonstrating POSLink integration with the Teya Unified ePOS SDK. This app shows how to connect an iOS ePOS application to a separate Teya payment card machine over the cloud.