Getting Started
Only use the POSLink API directly if no SDK is available for your platform. If your platform is covered by the Android, Windows or iOS SDKs, use the SDK instead. The direct integration is the same cloud-based integration the ePOS SDKs use, but your application handles authentication, token refresh, and the payment flow logic itself through raw request/response calls.
The Poslink API provides programmatic access to payment processing, refunds, store management, and terminal operations over RESTful endpoints.
How it works
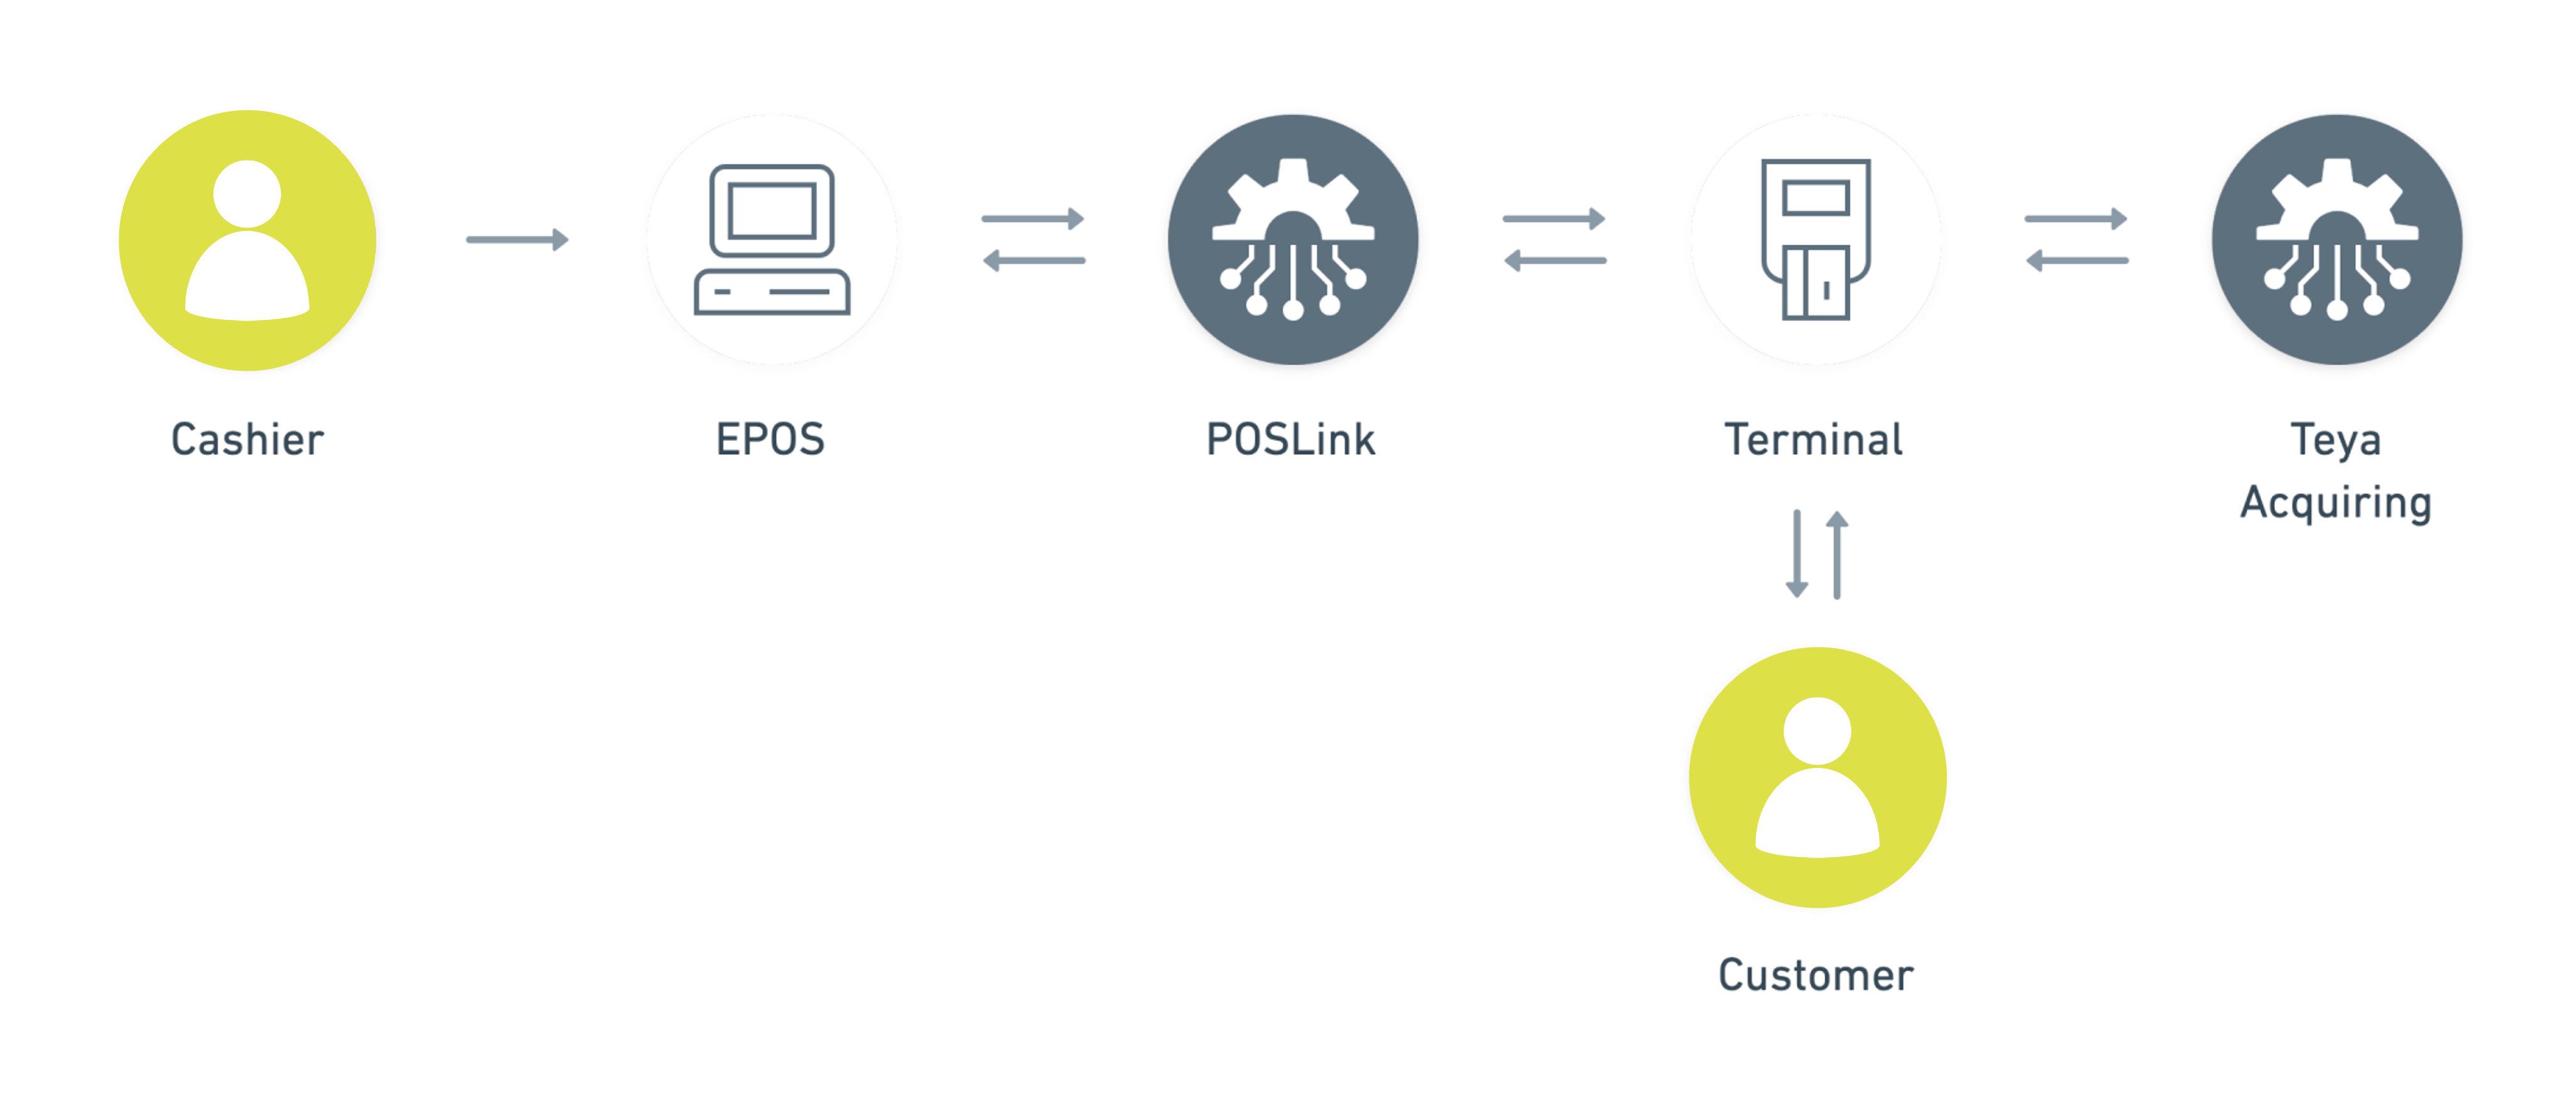
- The ePOS system initiates API calls to create, cancel, or retrieve payment requests.
- The Teya card machine fetches the corresponding payment requests.
- The Teya card machine then attempts to process the fetched payment requests.
Authenticate
Your ePOS uses OAuth 2.0 to act on a merchant's behalf, without ever storing their credentials. The merchant logs in with their Teya account email address, picks the store they want to connect, and your ePOS receives access and refresh tokens for that store. Because the login is email-based, there is no manual entry of store IDs or card machine configuration.
1. Merchant initiates connection in your ePOS
   ↓
2. Your ePOS redirects to Teya OAuth
   ↓
3. Merchant logs in with their Teya email
   ↓
4. Teya displays their available stores/terminals
   ↓
5. Merchant selects which store to connect
   ↓
6. Your ePOS receives tokens for that specific store
   ↓
7. Ready to process payments for selected store
Choose your flow
If no SDK is available for your platform and you implement OAuth directly, the choice depends on your ePOS architecture:
- Code Flow with PKCE - for applications that can open a web browser (Windows, web-based ePOS). Uses the authorisation and redirect URLs below.
- Device Code Flow - for devices with limited input capabilities or no browser access (mobile card machines, embedded systems). The merchant authenticates on their phone via QR code.
Both flows end the same way: an access token for API calls and a refresh token to keep the session alive.
Create authorisation and redirect URLs
The code flow needs two URLs: the authorization URL your ePOS sends the merchant to for login, and the redirect URL on your side that receives the authorization response.
Create the authorization URL
The completed URL looks similar to the following example:
https://id.teya.com/oauth/v2/oauth-authorize?
response_type=code&
client_id=<CLIENT_ID>&
redirect_uri=<REDIRECT_URI>&
scope=<SCOPES>&
state=<STATE>&
code_challenge=<CODE_CHALLENGE>&
code_challenge_method=S256&
ui_locales=<UI_LOCALES>&
nonce=<NONCE>
The URL includes the following:
response_type-codeindicates that your server expects to receive an authorization code.client_id- The client ID you received when you created your application.redirect_uri- The endpoint running on your application that receives the authorization response that contains the authorization code.code_challenge- A Base64-URL-encoded string of the SHA256 hash of the code_verifier.code_challenge_method-S256indicates the code_verifier field hashed with the SHA-256 function and base64 encoded.scope(optional) - One or more scope values indicating which parts of the user's account you wish to access.state(optional) - A random string generated by your application, which you'll verify later.ui_locales(optional) - We provideenandpt.nonce(optional) - A value generated by the client that should be checked in the token response to mitigate replay attacks.login_hint(optional) - Used to populate the login identifier, in our case, the email
Create the redirect URL
Add the redirect URL to your application settings in the developer dashboard. It must exactly match the endpoint of your application that processes the merchant authorization, and in production it must:
- Use HTTPS.
- Process the GET response from the merchant's authorization, including securely storing the access token, refresh token, and code verifier.
Handle the authorization response
Once the merchant logs in, the authorization page sends a GET response to your redirect URL:
https://my-app.com/redirect?code=<AUTH_CODE>&state=<STATE>
code- The authorization code. Use this value when you call the Token endpoint to get the access token and refresh token for the merchant account.state- The server should return the same state value that you passed. You should verify this to ensure the request is valid.
Your redirect endpoint must parse these parameters, exchange the code (together with the retained code verifier) for tokens, store the tokens securely, and refresh the access token in a timely manner. The single-use refresh token must be used within 30 days.
Code flow with PKCE
PKCE (Proof Key for Code Exchange) extends the Authorization Code flow: your client creates a random "code verifier", sends its hash (the "code challenge") in the authorization request, then proves possession of the verifier when exchanging the code for tokens. Even if an attacker intercepts the authorization code, they cannot exchange it for tokens.
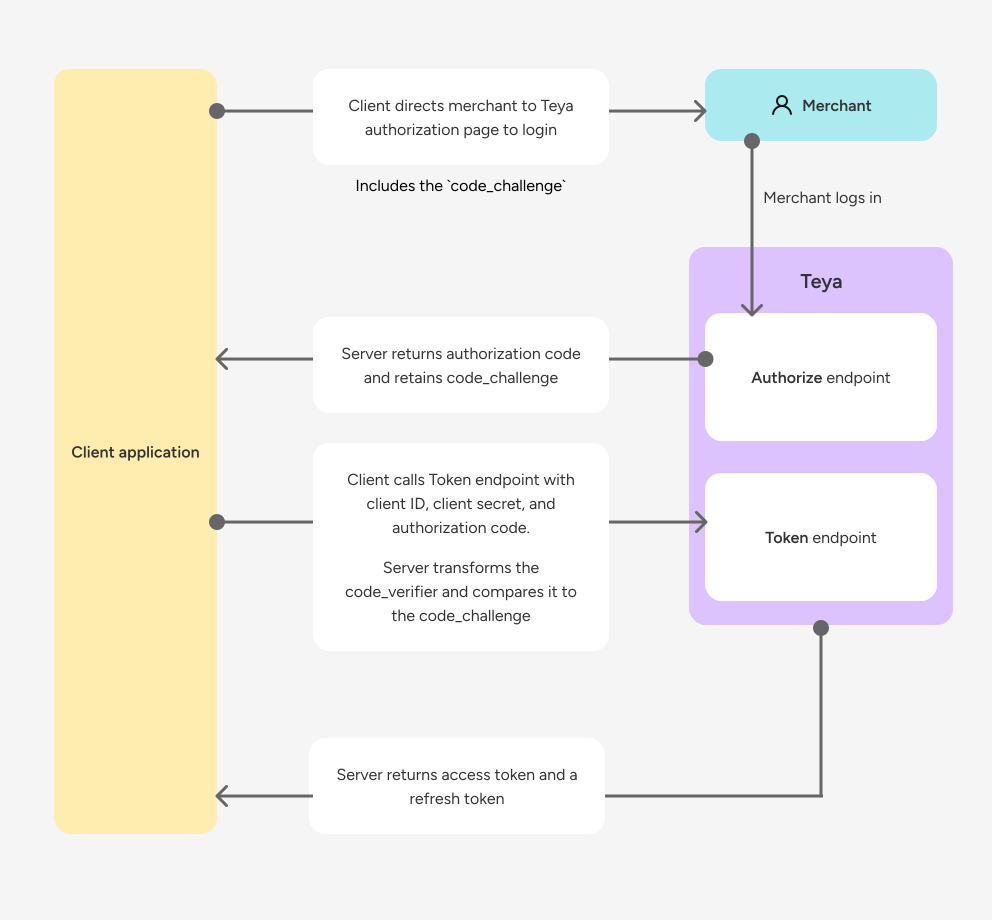
Step 1: Generate PKCE Parameters
Create a code verifier and code challenge:
function base64URLEncode(buffer) {
  return btoa(String.fromCharCode(...new Uint8Array(buffer)))
    .replace(/\+/g, '-')
    .replace(/\//g, '_')
    .replace(/=+$/, '');
}
function generateCodeVerifier() {
  const array = new Uint8Array(32);
  crypto.getRandomValues(array);
  return base64URLEncode(array);
}
async function generateCodeChallenge(codeVerifier) {
  const encoder = new TextEncoder();
  const data = encoder.encode(codeVerifier);
  const digest = await crypto.subtle.digest('SHA-256', data);
  return base64URLEncode(digest);
}
const codeVerifier = generateCodeVerifier();
const codeChallenge = await generateCodeChallenge(codeVerifier);
console.log('code_verifier:', codeVerifier);
console.log('code_challenge:', codeChallenge);
console.log('code_challenge_method: S256');
Step 2: Authorization Request
Redirect the user to the authorization endpoint:
GET https://id.teya.com/oauth/v2/oauth-authorize?
  response_type=code&
  client_id=YOUR_CLIENT_ID&
  redirect_uri=YOUR_REDIRECT_URI&
  scope=REQUESTED_SCOPES&
  state=RANDOM_STATE_STRING&
  code_challenge=CODE_CHALLENGE&
  code_challenge_method=S256
Step 3: Handle Authorization Response
After user authorization, you'll receive a callback with the authorization code:
// Example callback URL
https://your-app.com/callback?code=AUTHORIZATION_CODE&state=STATE_VALUE
Step 4: Exchange Code for Token
Exchange the authorization code for an access token:
POST https://id.teya.com/oauth/v2/oauth-token
Content-Type: application/x-www-form-urlencoded

grant_type=authorization_code&
code=AUTHORIZATION_CODE&
client_id=YOUR_CLIENT_ID&
client_secret=YOUR_CLIENT_SECRET&
redirect_uri=YOUR_REDIRECT_URI&
code_verifier=CODE_VERIFIER
Get access and refresh tokens
Use the authorization code to call the Token endpoint at https://id.teya.com/oauth/v2/oauth-token.
The authorization code expires 5 minutes after it is generated and must match exactly the code you received. If it expires before you exchange it, the merchant must log in again to create a new one.
Provide the following parameters in the body:
grant_type-authorization_coderedirect_uri- The same URI provided before.code- The authorization code received in the callback.code_verifier- The code_verifier generated before.
Plus, provide CLIENT_ID:CLIENT_SECRET encoded as base64 in the authorization header, sent as a basic token:
Authorization: Basic Q0xJRU5USUQ6U0VDUkVU
A complete cURL example:
curl -Ss -X POST \
https://id.teya.com/oauth/v2/oauth-token \
-H 'Authorization: Basic <CLIENT_CREDENTIALS_AS_BASE64>' \
-H 'Content-Type: application/x-www-form-urlencoded' \
-d 'grant_type=authorization_code&redirect_uri=<REDIRECT_URI>&code=<YOUR_CODE>&code_verifier=<CODE_VERIFIER>'
A response looks similar to the following:
{
  "token_type": "bearer",
  "access_token": "<ACCESS_TOKEN>",
  "refresh_token": "<REFRESH_TOKEN>",
  "expires_in": 620569
}
Store both values securely. Access tokens are short-lived and are replaced using the refresh token.
Refresh the access token
Your application can use the refresh token to request a new access token at any point until the refresh token itself expires. Two rules to keep in mind:
- Refresh tokens can only be used once;
- A new access token/refresh token pair is issued on every refresh, and the previous refresh token is invalidated.
Token lifetimes:
Code flow with PKCE
Access tokens: 15 minutes
Refresh tokens: 30 days
Device code flow
Access tokens: 1 day
Refresh tokens: 15 years
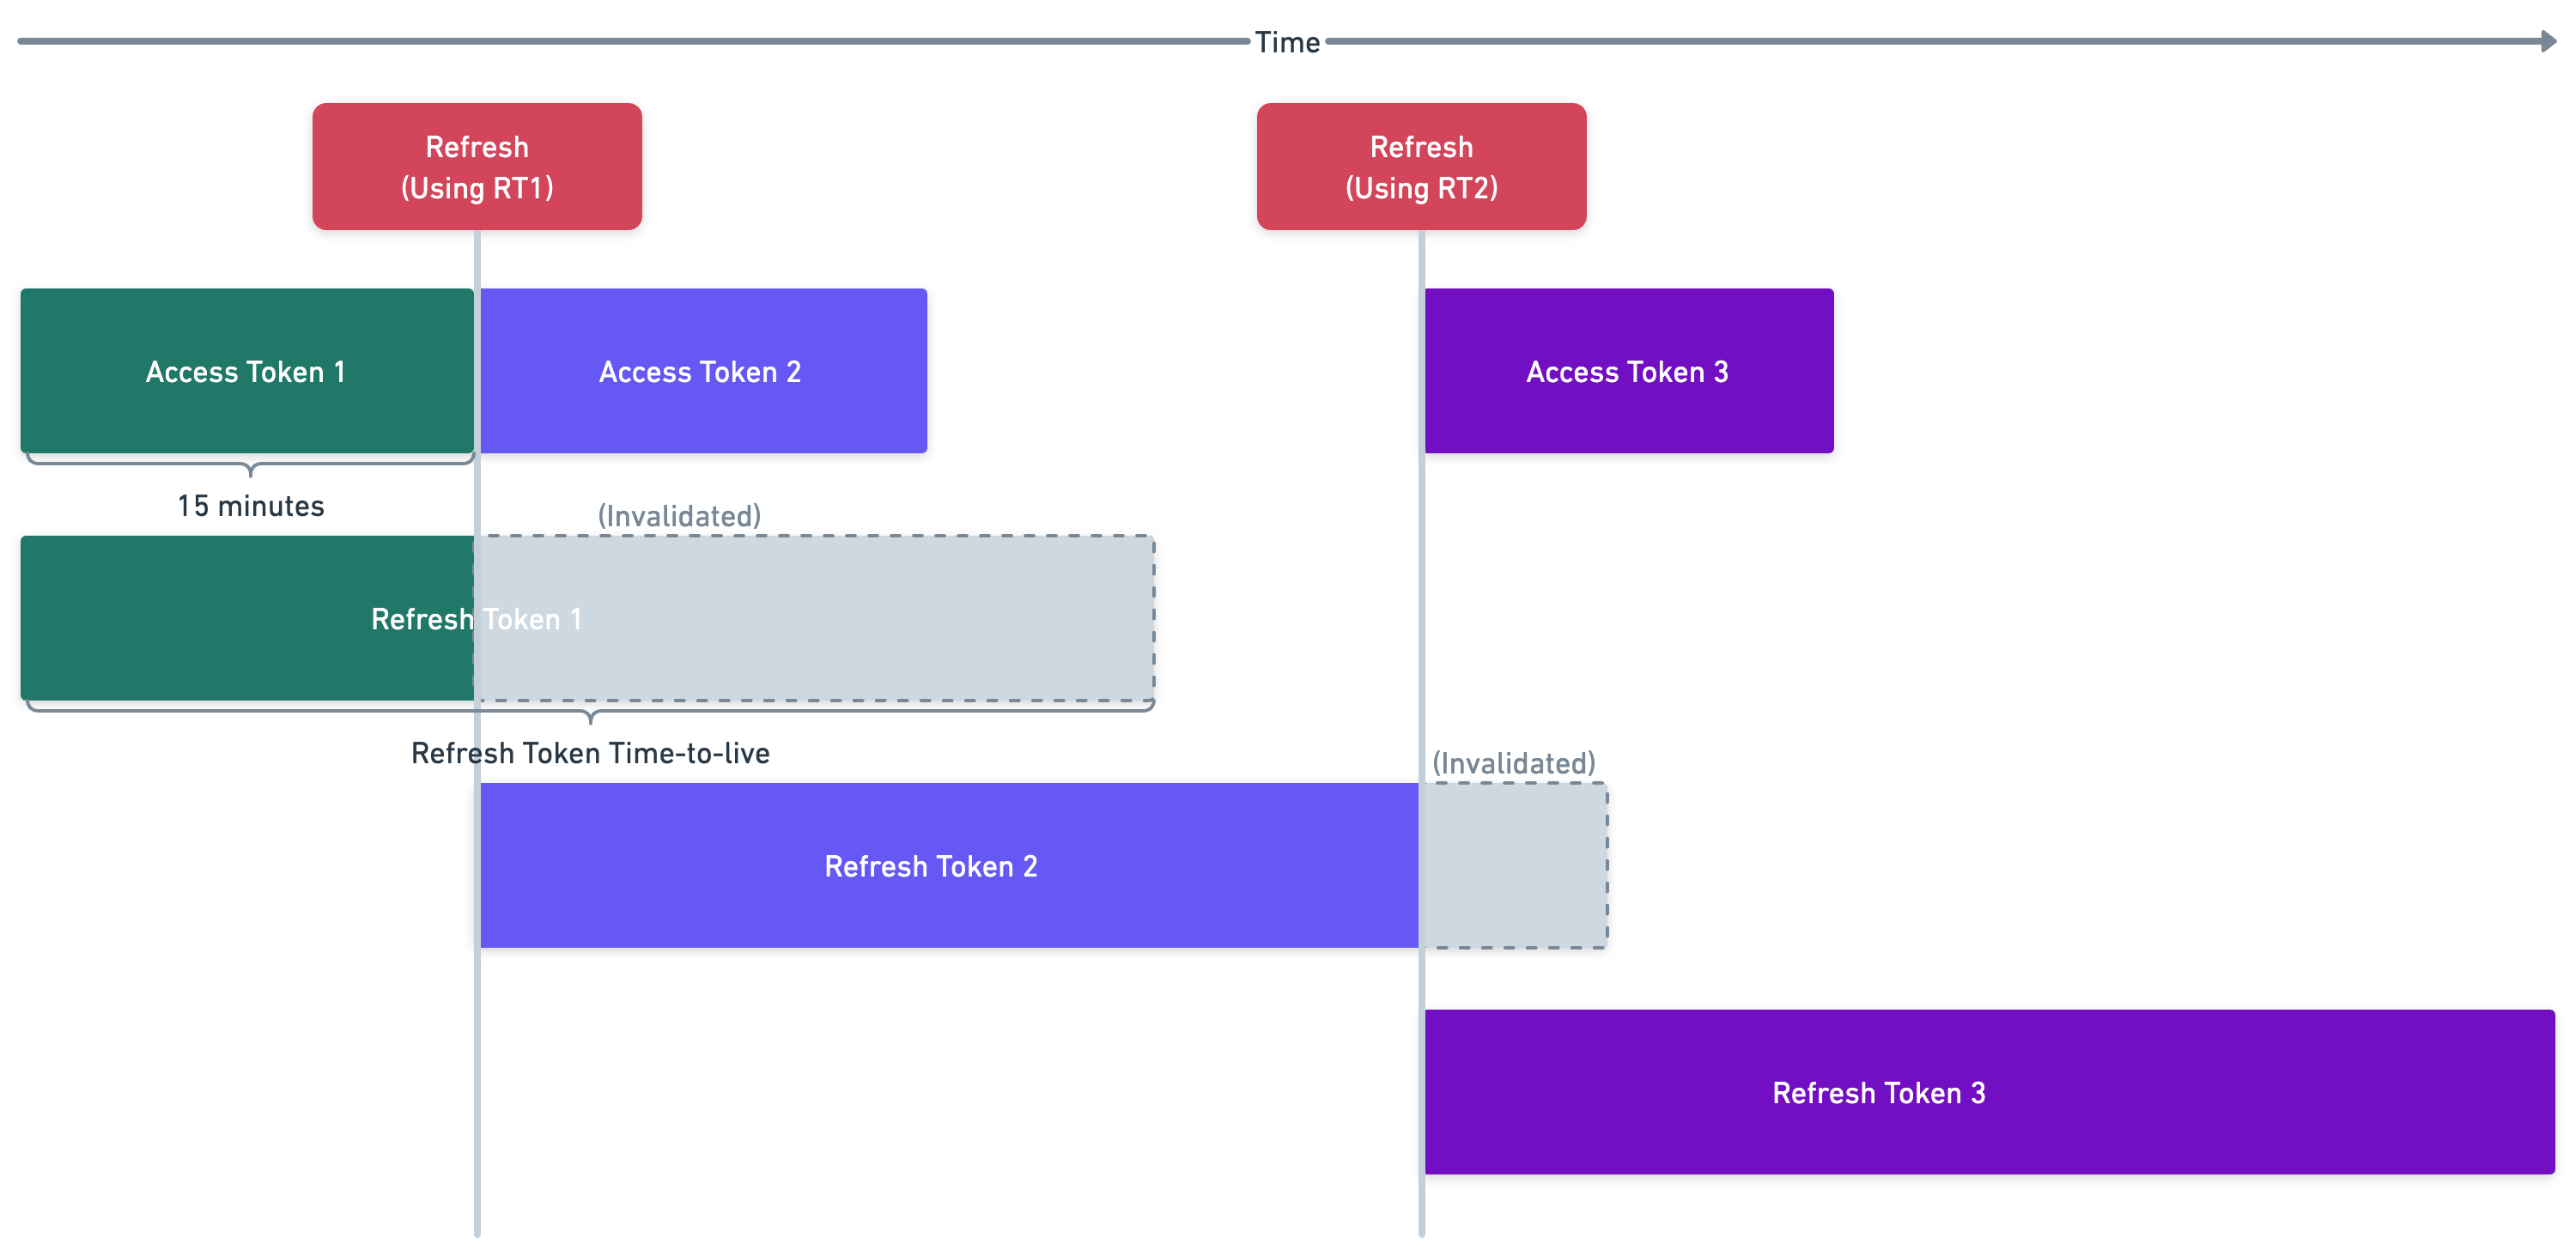
Trying to refresh after the refresh token has expired returns an error, and a new login flow must be triggered from the beginning.
Since a refresh token can only be used once, protect against concurrent refreshes, for example with a shared token store and mutexes. If you are using an OAuth 2.0 library, it probably already handles this logic for you.
If a request fails with a 401, refresh the access token once, silently, and retry the request before giving up. If that refresh also fails, prompt the merchant to reconnect rather than retrying indefinitely.
Refresh token call examples
curl -Ss -X POST \
https://id.teya.com/oauth/v2/oauth-token \
-H 'Authorization: Basic <CLIENT_CREDENTIALS_AS_BASE64>' \
-H 'Content-Type: application/x-www-form-urlencoded' \
-d 'refresh_token=<CURRENT_REFRESH_TOKEN>&grant_type=refresh_token'
| PARAMETER | MANDATORY? | VALUE |
|---|---|---|
refresh_token |
Yes | The current, valid refresh token. |
grant_type |
Yes | refresh_token |
scope |
No | Optionally, you can send a subset of the originally requested scopes as a space-separated string of scopes. If possible, that will result in a decrease in the scope level of the new token. |
Response:
{
  "token_type": "bearer",
  "access_token": "<NEW_ACCESS_TOKEN>",
  "refresh_token": "<NEW_REFRESH_TOKEN>",
  "expires_in": 620569
}
| PARAMETER | ALWAYS PRESENT? | VALUE |
|---|---|---|
access_token |
Yes | The new, recently refreshed access token |
refresh_token |
Yes | A new refresh token. It replaces the previous refresh token and must be used for the next token refresh instead |
expires_in |
Yes | The time to live of the access token in seconds |
scope |
No | If not present, the requested scopes were issued. If present, the issued scopes may differ from the previous scopes. |
token_type |
Yes | bearer |
Device Code Flow
This flow obtains tokens on devices where entering credentials is impractical. Your device initiates the flow and displays a QR code; the user scans it and authenticates on their mobile device while your device polls the OAuth server until authentication completes.
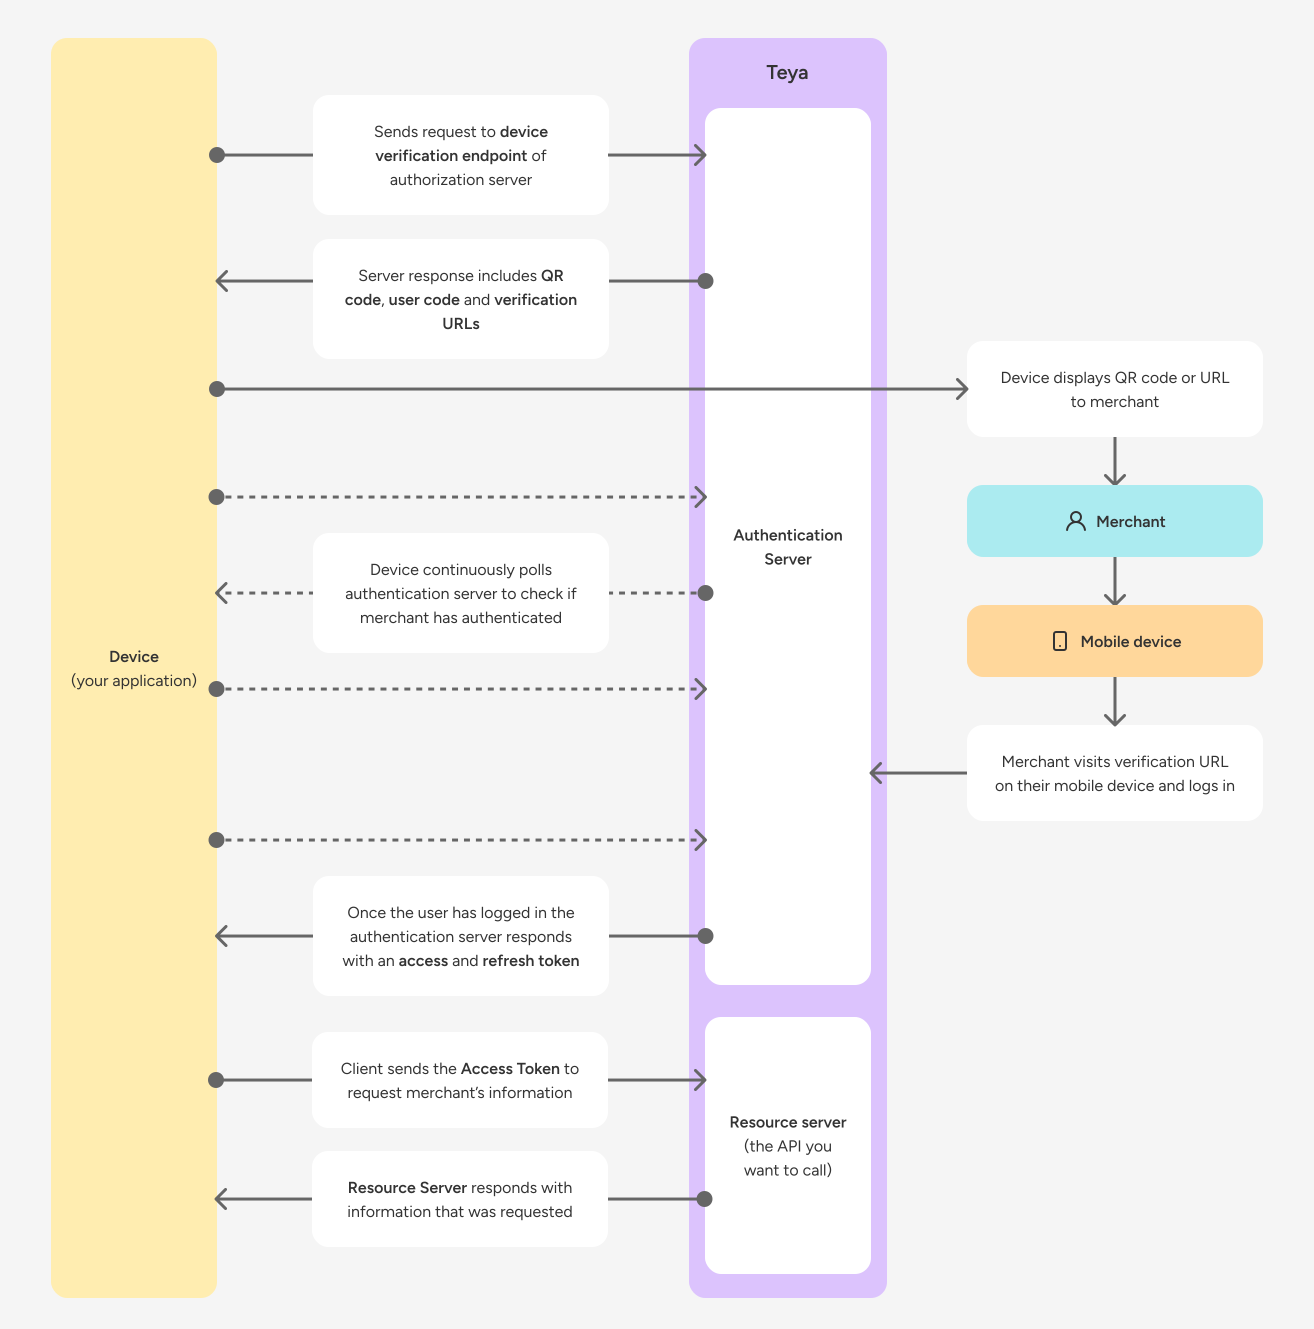
Device verification request
Your device sends a request to the Device verification endpoint to initiate the flow.
Request:
curl -Ss -X POST https://id.teya.com/oauth/v2/device \
  -H 'Content-Type: application/x-www-form-urlencoded' \
  -d 'client_id=<YOUR_CLIENT_ID>&client_secret=<YOUR_CLIENT_SECRET>'
Request Parameters
client_id- The ID of the requesting client.client_secret- The secret of the client.
Response:
{
  "user_code": "CDYVJG",
  "verification_url": "https://id.teya.com/oauth/v2/verify",
  "verification_url_complete": "https://id.teya.com/oauth/v2/verify?code=CDYVJG",
  "device_code": "7e7869c9-ed72-4117-9178-d66d5d5f0f8c",
  "qr_code": "data:image/png;base64,iVBORw0KG....",
  "interval": 5,
  "expires_in": 600
}
Response Parameters
user_code- The code to present to the user, that the user needs to enter on the mobile device.verification_url- The URL the user should visit to enter the user_code and authenticate.verification_url_complete- The verification_url with the user_code added as query for shorthand access.device_code- The code the device should use to poll and retrieve tokens from the token endpoint.qr_code- An image as data url to present, contains the verification_url_complete encoded.interval- The polling interval the device should respect when waiting for user approval.expires_in- The time is seconds the device_code and user_code is valid for
The user authenticates on another device
The user needs to visit the verification URL. You have several options for facilitating this:
- Display QR code: The user scans the
qr_codeon their mobile device which directs them to theverification_url_completeto authenticate. They just need their email and password. - Display verification_url_complete: The user clicks this link directly and authenticates with email and password as above.
- Display verification_url AND user_code: The user needs to visit the URL, enter the
user_codewhen prompted and also authenticate with email and password.
Once the user authenticates the user flow is complete and they can close the browser.
Token request
While the user authenticates, your ePOS polls the Token endpoint (respecting interval) until it returns tokens.
Request:
curl -Ss -X POST https://id.teya.com/oauth/v2/oauth-token \
  -H 'Content-Type: application/x-www-form-urlencoded' \
  -d 'grant_type=urn:ietf:params:oauth:grant-type:device_code&device_code=7e7869c9-ed72-4117-9178-d66d5d5f0f8c&client_id=<YOUR_CLIENT_ID>&client_secret=<YOUR_CLIENT_SECRET>'
Request Parameters
client_id- The ID of the requesting client.client_secret- The secret of the requesting client.grant_type- Defines the flow type, here device flowdevice_code- The device code from the Device Verification Endpoint Request
Response:
{
  "access_token": "eyJhbGciOiJIUzI1NiIsInR5cCI6IkpXVCJ9.eyJzdWI",
  "refresh_token": "def456",
  "expires_in": 3600,
  "scope": "user_info, purchase_items",
  "token_type": "Bearer"
}
Response Parameters
access_token- The resulting access token for the flowrefresh_token- Only issued if the client is configured to receive refresh tokensexpires_in- The time to live of the access token in secondsscope- If not present the requested scopes where issued. If present the issued scopes may differ from the requested scopes.token_type- Describes how the token can be used. Most commonly Bearer token usage.
Once you have the tokens, store them securely and refresh the access token before it expires.